Jesus, where do I even begin with this one? Sunday at my mum’s house, January 2024. I’d offered to do the roast, which turned out to be a big mistake. I thought I was doing the right thing, you know? “Leave it to me, Mum, I can handle it. Famous last words.
Two hours later, I’m standing in her kitchen holding what can only be described as chicken jerky. Dry as a bone and leathery, and my poor dad was trying to be all polite as he sawed it with a steak knife. My 7-year-old nephew takes a bite and says, “Uncle Tom, this tastes like cardboard.” From the mouths of babes, eh?
That’s when my mum, bless her, sat me down and said, “Right, love, let me show you how it’s actually done.” Best cooking lesson of my life.
The Shopping Bit (Don’t Overthink It)
Here’s what you need for this simple roast chicken recipe, and I mean really need; none of that fancy chef nonsense:
- One whole chicken, obviously. Roughly 1.5 kg to feed four, but I always go for a bigger one, as leftover roast chicken sandwiches are the best, aren’t they? Free-range if your wallet can take it, but don’t stress if this isn’t the case.
- Butter. Real butter, not that margarine nonsense. About 50 g, soft enough to spread without tearing the skin.
- Salt and black pepper. Proper seasoning, not the dusty stuff that’s been lurking in your cupboard since 2018.
- Fresh herbs if you’ve got them: thyme and rosemary are my go-tos. Rosemary, sage, thyme and parsley make a brilliant combination, and tarragon works beautifully with chicken when it’s in season. But honestly, dried herbs work fine if that’s what you’ve got.
- One lemon. Trust me on this one.
- A couple of garlic cloves if you fancy it.
The Method That Actually Works
OK, preheat your oven to 200°C. None of this “start it cold” bollocks; get it properly hot first.
Take your chicken out of the refrigerator 30 minutes before you start cooking. Cold bird, hot oven is a recipe for disaster; it cooks unevenly, and you’re left with my cardboard conundrum.
Pat the skin completely dry with a kitchen roll. This is properly important, as wet skin equals soggy skin, and nobody wants that. Remove any giblets from the cavity (I learnt this the hard way when I forgot and ended up with a plastic bag melting inside my chicken).
Ok, this next part is going to seem a little crazy the first time you try it. You’ll want to slide your fingers between the chicken skin and meat; yucky, I know, but bear with me. It’s like trying to separate cling film that’s stuck together, except it’s a dead bird. Lovely.
Blend your soft butter with whatever herbs you have around; I always add parsley at the very least (although generally more), a bit of basil if it’s around, and maybe some marjoram from the garden. Then you simply rub this herby butter into those pockets you’ve made under the skin. The first time I did this, my wife walked in on me and asked what I was doing, “molesting the chicken”. Fair point, really.
The whole thing feels proper weird, like you’re taking a chicken to the spa. But this is the alchemy, as that butter melts during the cooking, and so the meat doesn’t dry out completely. Game changer.
Then you have to be ruthless with the seasoning on the outside. I mean good and generous; none of that polite sprinkling nonsense. The skin is thick; it requires lots of salt and pepper to actually taste of something other than rubber.
Fill the cavity with half a lemon, some cloves of garlic, and any straggly bits of herb stalks you have lying around. This is not just for show; it lets steam into the chicken from the inside and adds loads of flavour.
Getting the Temperature Right (Because Nobody Wants Food Poisoning)
Chuck it in the oven breast-side up. The safe internal temperature for chicken is 74°C; please consider using a meat thermometer if you don’t have one already. About fifteen quid from Argos and it’ll save you from serving raw chicken to your family.
Cooking time depends on the size, but is roughly 20 minutes per 500g plus an extra 20 minutes. So a 1.5 kg chicken needs about 80 minutes. But ignore the clock and trust the thermometer; stick it in the thickest part of the thigh, making sure you’re not touching bone.
The juices should run clear when you cut into the thickest part of the meat, and there should be no pink flesh visible. If you’re still seeing pink, give it another 10-15 minutes.
The Resting Game Changer
Here’s where most people mess up. They carve the chicken the second it comes out of the oven. Don’t do this. Let it rest for at least 10–15 minutes after cooking. Cover it loosely with foil to keep it warm.
This resting time lets the juices redistribute through the meat instead of running all over your carving board. It makes the difference between dry chicken and proper juicy meat.
My Mistakes So You Don’t Have To
For the first few attempts, I kept opening the oven door to check on things. Bad idea. Every time you open that door, you’re letting heat out and extending the cooking time. Trust the process and leave it alone.
Also used to baste constantly, thinking I was being clever. Turns out this just makes the skin soggy and doesn’t really help the meat stay moist, as the herb butter under the skin does that job better.
Biggest mistake, though? Not using a thermometer. I was guessing based on cooking times from recipes, but every oven’s different, and every chicken’s different. The thermometer takes all the guesswork out of it.
What to Do with the Pan Juices
Don’t waste those lovely juices at the bottom of the roasting tin. Pour them into a jug, let the fat settle, then either use them as gravy or pour them over the carved chicken. Proper liquid gold, that stuff.
If you want proper gravy, stick the roasting tin on the hob, add a tablespoon of flour to the juices, whisk it about, then gradually add chicken stock. Season to taste, and you’ve got gravy that actually tastes of chicken.
The Final Result
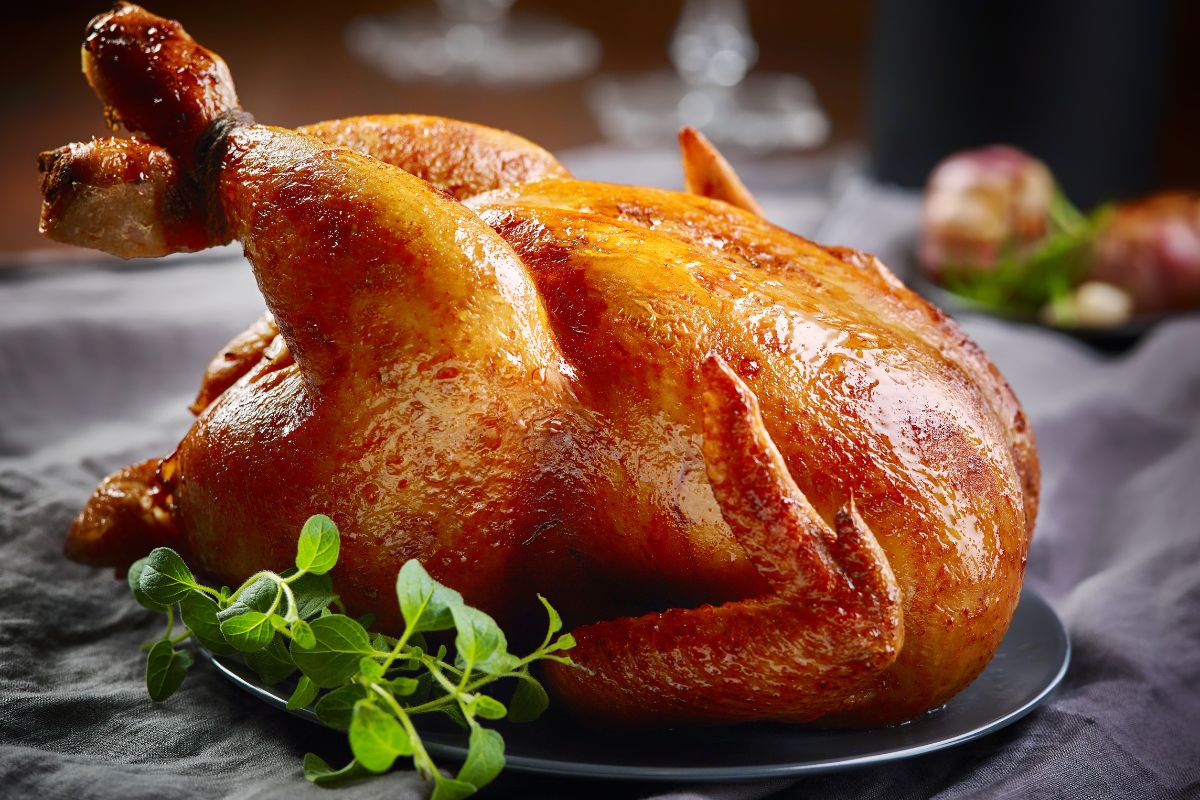
This simple roast chicken recipe has never let me down since that disaster at Mum’s. The meat stays juicy, the skin goes properly crispy, and it actually tastes like something worth eating.
My nephew, the harsh critic, now asks when I’m making “the good chicken” whenever we’re planning Sunday dinner. High praise from a seven-year-old.
Best part? Once you get the hang of it, this method works every single time. No more dry chicken, no more embarrassing dinners, no more ordering takeaway because you’ve ruined the roast again.
Just remember: good ingredients, proper temperature, and patience. Oh, and invest in that thermometer. Your family will thank you for it.